Thursday, May 23, 2013

Creative Ca$h Projects

Money can be a fun gift for the recipient, but sometimes, it doesn't always feel quite so fun when giving it out!  So I have been looking for fun ways to give CA$H GIFTS!  

Recently, both of my nephews graduated.  One graduated from 8th grade and is entering high school and the older one just graduated from high school.  

For Christmas this year, I actually gave them both boxes of kleenex....filled with a roll of money I had taped up to come out when the first tissue was actually pulled.  They got a big kick out of that.  Unfortunately, I didn't take a picture of those.  (I am now kicking myself for not getting any documentation from that projects).  And it certainly didn't last long once they discovered I did not just give them the cheapest and most ridiculous Christmas gift ever!  :)  There are quite a few of these projects found on Pinterest HERE.

So here is what I came up with for their graduation gifts.

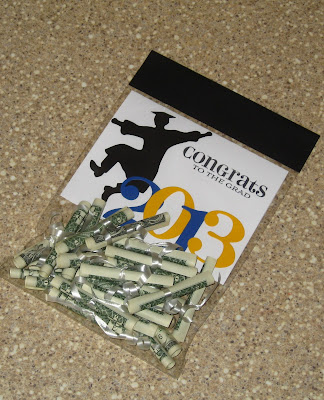
For the 8th grader I rolled up single dollar bills to look like little diplomas and put them in a clear cellophane bag.  I also inserted the card I made for him as well (complete with personalized school colors).  I then added a topper to the bag to close it all up.  (I later personalized it a bit more by stamping his name on the topper in big, bold white letters).  


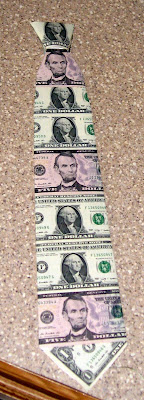
For my older nephew, I saw this idea floating around on the internet and went for it!  I knew if I succeeded in creating this "Money" Tie, that my nephew would be awesome enough to actually wear it....AND HE DID...to his graduation ceremony!!!

I think it turned out pretty great!  The only changes I would ever make...um...to have more cash and make it out of $50's and $100's!  LOL!  (I will continue to dream...as will all my nephews and nieces).  


Here is how I presented it to him.  I went out and got a dress shirt in his size and attached the tie to it.  I then added some colorful crumpled tissue paper to the bottom of a shirt box and placed it in there with his card.  I left a top off of it...I mean, come on, I wanted to get some "ooohhs and ahhhhs" from the other grad party attendees.  :)


Both of these projects are simple to put together.  All you need is some ca$h.  :)

1st project:
money
ribbon
- roll bills up as tightly as you can and tie with ribbon.

2nd project:
money (I used $35)
tie (for template) 
scotch tape

I just had my husband tie a tie as he normally would and then we loosened it up and took it off and I laid it out on some paper.  I then traced around it from the knot to the bottom of the tie and back up.  I cut that out and had my template to start taping money to it.  I just used regular scotch tape.  The front of the tie is what you need to concentrate on, but the back of the tie I just kind of covered it all up with the extra bills so you could not see the paper template anymore.  

Thanks for stopping by and letting me {PIN}spire you!  
Monday, October 22, 2012

Diaper Babies

Saw THIS on Pinterest.  I had a perfect occasion coming up to create these adorable little babies!

My sister-in-law is due with her second baby and we threw her a little Sprinkle this past weekend.  She's having a girl this time around, so she needed some PINK!

Here is the basket I created with the Diaper Babies.  (all you need are some baby washcloths, diapers, and baby socks).  


Here is a close up.  I used googly eyes on some and on the others I just drew "closed eyes" with a permanent marker.

In addition to that, I also made a little "Owl Themed" Basket too.  (the baby room is a super cute owl theme).  I found some cute owl themed fabric and sewed (my first ever!) diaper rags.  I found those super cute owl dishes at Target.  And in the basket is an Owl card that I handstamped. (you can see a better picture of that below).

These are the favors I created.  We got Essie nail polish in various shades of pink.  I used a Onesie Die Cut to create the adorable tags.  The image on the tag is a tiny baby foot (fitting to go with nail polish) and the sentiment reads "It's a girl".  

Here is the card I created for my sister-in-law and the sweet little baby to be!

Thanks for peeking in!  I am so happy I could share my {PIN}spiration with you!


Wednesday, October 17, 2012

Father's Day Handprint Artwork on Canvas

I started making these in June of 2009 when our first child was just a little over a year old.  Each Father's Day, I have continued the tradition.  We give Daddy this canvas artwork to hang up at work in his office.  It's so fun to see how our little guy has progressed and grown over each year.  And every year he has more control over the project.  The first year I helped along and chose the colors.  The following year, I still chose the colors but our little guy had a little more freedom with the painting (but I still assisted with the handprint).  
As of this year he was a little over 5 and he chose the colors and did all the painting.  (You can see in 2011 we had another addition to the family).  We decided we would let my son continue with handprints and my daughter will add her footprints to the picture.  

I think these make great yearly gifts for Father's, Mother's, Grandparent's, Aunts & Uncles, etc.  It's a fun and inexpensive gift.  All you need is some acrylic paint (in as many colors as you would like) and an artist's canvas.  There are a variety of sizes.  We use 8x10.  You could do a theme and make it in Holiday colors each year!  


Thanks for stopping by!  I hope my project has {PIN}spired you!


Tuesday, September 4, 2012

Crockpot Pineapple Chicken

Happy Tuesday!  I hope everyone enjoyed the holiday weekend!  

Today is a FOOD post instead of a craft.  

Last week I made this Crockpot Pineapple Chicken after pinning it a few days earlier.

So here is what it should have looked like.

Here is my outcome.  LOL!

Okay, so I didn't use white rice.  We prefer the brown rice around here.  It's slightly healthier and all.  And here are the changes I would make.  
It was good, but a little too salty (I suspect from the massive amount of soy sauce).
My pineapples soaked up a lot of the liquids as well and lost their pretty color and yummy taste.

So, I am going to try adding only 1/4 (or even a little less soy sauce)
I will use the entire can of juice from the pineapples.
And I am going to add my pineapples maybe halfway through the cooking time.

I would rate it maybe 2.5 to 3 stars out of 5 this time around.

I will keep you posted when I make it again.

Monday, August 27, 2012

Keepsake Ornament

Happy Monday!  Today I am sharing a Keepsake Ornament that I made after viewing this post on Pinterest.

My sister-in-law recently got married and I thought this would be a lovely keepsake gift for her.  It's such a creative way to hold onto your wedding invitation (instead of packing it away somewhere...like mine).  LOL!

It also went along nicely with my Themed Gift Basket at her wedding shower.  I put together an entire basket full of cute little holiday knick knacks to cover EVERY holiday throughout the year.  I thought it would be a fun idea to have some cute holiday decor in their new home together.  Plus I am a sucker for all holiday decor.  I put towels, frames, ornaments, candy dishes, signs, etc.  Just a few items to represent all the holidays.  So, as I said, this ornament fit in for CHRISTMAS.

Here is the ornament I made for my sister-in-law.


I loved it so much I made one with my daughter's birth announcement.  (now I need to dig out my son's)  

I even dug out my wedding invitation so I could have my own keepsake, too!

If you'd like to create your own you need:
Clear ornament (from Hobby Lobby/Michaels)
Ribbon
Invitation
Paper cutter

Cut invitation/announcement into thin strips, wrap them around a pencil/pen to curl them, and then place them inside the ornament.  The paper kind of relaxes and the pieces fall into place, perhaps with some manipulation.

Don't want to make your own?  Contact me and I would be happy to create one for you!  These are GREAT gift ideas.  They can be used for weddings, showers, announcements, milestone birthdays, etc!

Thanks for visiting!  I am so glad I could PINspire you!  

Monday, August 20, 2012

Jeepers Creepers!

Happy Monday!  I am back with another weekly "PINSPIRATION" Project!

Again, in order to try and get a bit ahead of myself here, I am sharing a project I made last year!  I cannot wait for Halloween time so I can bust it out to add some Halloween Decor to our home!

I saw the original idea HERE.

I will say it took a lot longer than I had anticipated.  I think it roughly took me 3 days to get it all finished.
I do love the finished product!  If you'd like to have one of these, but don't have the time or the crafty experience...let me know!  I would be happy to create one for you for a fee.  Please contact me!

Check it out in my Etsy Store.


To Make Your Own:
Wood Frame (got mine from Michael's)
Small wood letters (Michael's)
Various Googly Eyes (Michael's)
Craft Paint (Michael's)
Ribbon (PTI)
Glue Gun/Craft Glue
Black paper/stamp/white ink

THANKS FOR LOOKING!  :)

I hope to PINSPIRE you again next week!

Monday, August 13, 2012

Pinspiration Project #1: Halloween 2011 - Barbie Doll Head

Happy Monday!  While I don't have a "new" project to share with you, I do have a few projects that I have done in the past year after being inspired on Pinterest.  So while I get into the groove of the beginning of a new school year and adjust to an actual daily routine, I figured I would share some previous projects to start us off.

Today I am going to share with you the Halloween costume that I made last year.

I am a Barbie Girl, so when I saw this on Pinterest last year I was so excited!  I thought the costume was not only super fun, but pretty unique.  I had never come in contact with anyone in this costume in all my years of Halloween parties and such.

The original pin can be seen here:http://pinterest.com/pin/47710077272911492/


Here was my final result:

My hubby dressed up as Ken

Items needed to re-create this costume:
Large piece of cardboard - cut out the center to fit around your arms/shoulders snuggly.
Round tablecloth (I used plastic)
Random make up, make up brushes, hair curlers, brush, comb, etc.  (I glued these down with a hot glue gun)
You can't see in the picture but I also cut out a small circle near my left arm/shoulder to make myself a perfect drink holder.  LOL!  I had a Pink Solo Cup complete with a straw so that I was able to have a few beverages.  
Wig (optional) I just thought it gave me more of that "fake" doll appearance.

I wore a strapless tank top and jeans.  The tablecloth draped down over most of my legs.

Thanks for stopping by!  I hope you have seen something that just may have "pin"spired you!